Saturday 6 October 2012

MERGE JOIN TRANSFORMATION


            Using Merge Join transformation we can join two sorted data sets based on common column. We can perform “Inner join, Left outer join and Full outer join" using Merge join transformation.

Sample package creation:
Requirement:-
Two source tables are available EMP (is having Employee information) and DEPT (is having department information).

EMP Table:-
CREATE TABLE EMP (ID INT,NAME VARCHAR(20),DEPT_ID INT)
GO
INSERT INTO EMP VALUES (101,'A',10)
INSERT INTO EMP VALUES (102,'B',20)
INSERT INTO EMP VALUES (103,'C',10)
INSERT INTO EMP VALUES (104,'D',30)


DEPT Table:-
CREATE TABLE DEPT (DEPT_ID INT,LOC VARCHAR(20))
GO
INSERT INTO DEPT VALUES (10,'Location1')
INSERT INTO DEPT VALUES (20,'Location2')
INSERT INTO DEPT VALUES (30,'Location3')

Join the source tables based on ‘DEPT_ID’ column and load the source data into target table “EMP_TARGET”.

EMP_TARGET:-
CREATE TABLE EMP_TARGET (ID INT,NAME VARCHAR(20),DEPT_ID INT,LOC VARCHAR(20))

Package creation:


  • Open BIDS.
  • F
    rom Control flow items, drag and drop “Data flow task” into designer surface.
  • From Data flow items, drag and drop tow “OLEDB Sources” into designer surface (Firs one is for “EMP Table” second one for “DEPT Table”) 
  • Map the "OLEDB Sources" with source tables.
  • We need to sort the source data based on ‘DEPT_ID’ column because “Merge Join” transformation accepts only sorted data sets as input.
  • We can sort the source data in two ways.
    o   Using Sort transformation.
    o   Using OLEDB source “Advanced Editor
  • In this example I used ‘OLEDB Source Advanced Editor’ to sort the source data sets.
  • From Data flow items, drag and drop the “Merge Join” transformation into designer surface.


  • Select ‘OLEDB source’ (EMP) green arrow and connect to the transformation. Then “Input Output Selection” Window will open. In that window, Select “Merge Join Left Input” from the “Input:” drop down list.


  • Select second ‘OLEDB Source’ (DEPT) green arrow and connect to the transformation.


  • Right click on “Merge Join” and select “Edit” option.


  • Select ‘Join type:’ as Inner join and select the required columns and click “OK” button.


  • From ‘Data flow’ items, drag and drop “OLEDB Destination” into Designer surface.
  • Connect the ‘Merge Join’ transformation green arrow to ‘OLEDB Destination’.
  • Map the ‘OLEDB Destination’ to the target table and execute the package.


Target table Output:


Friday 5 October 2012

MERGE TRANSFORMATION


The “Merge transformation” combines two sorted data sets into single sorted data set. The Merge transformation accepts only two sorted data sets as input. It combines the source data sets into single data set and sends to the transformation output.

            If we don’t want to sort the data sets or having more than 2 source data sets, then we can use “Union all” transformation to combine the data sets.

Sample package:

Requirement:-

I am having two tables (Product1, Product2), those are having product information. I need to create a file with product information from the two product tables.

Source table creation script:-

Product1:-
CREATE TABLE Product1(ID int,Name varchar(20),Price decimal(8,2))
go
insert into Product1 values (101,'Salt',10)
insert into Product1 values (102,'Rice',30)
insert into Product1 values (103,'Oil',60)

Product2:-
CREATE TABLE Product2(ID int,Name varchar(20),Price decimal(8,2))
go
insert into Product2 values (201,'Pen',10)
insert into Product2 values (202,'Book',30)
insert into Product2 values (203,'Bag',60)

Package creation:-

  • Open BIDS.
  • From Control flow drag and drop “Data flow task” into designer surface.
  • Go to “Data flow”, from data flow items drag and drop two ‘OLEDB sources’ into designer surface (one is for Product1 other one is for Product2).
  • Map the OLEDB sources with source tables.
  • We need to sort the source data because “Merge” transformation accepts only sorted data sets as input. Based on “ID” column I am going to sort the source data sets.
  • We can sort the source data in two ways
  • In this example I used ‘OLEDB source Advanced Editor’ to sort the source data sets.
  • From data flow items drag and drop the “Merge” transformation into designer surface. 


  • Select one of 'OLEDB sources' green arrow and connect to the transformation. Then “Input Output Selection” window will open. From “Input:” drop down list box select “Merge Input 1” and then click “OK”.


  • Select the second OLEDB source green arrow and connect to the “Merge” transformation.

 
  • Right cilck on “Merge” transfomation and select “Edit” option, then “Merge Transformation Editor” window will open.Check the column mappings and click “OK” button.

  • From data flow items drag and drop the “Flat File Destination” into designer surface. Connect the “Merge transformation” green arrow to the destination.
  • Configure the “Flat File Destination” and then execute the package.  


Output File:

Monday 1 October 2012

SORT TRANSFORMATION


Sort transformation sorts the input data in ascending or descending order and sends to the transformation output.

Example:

            I am having a source file “Sort”, that contain persons information shown below screen shot.


            The source data I want save it into another file “Sort_Target”, the target file data should be in descending order based on ID column.

Package creation:

  • Open BIDS.
  • From control flow items, drag and drop “Data flow task” into designer surface.
  • Go to “Data flow”, from data flow items drag and drop “Flat file source” into designer surface. Configure the flat file source with source file.
  • From Data flow items drag and drop the “Sort” transformation into designer surface.
  • Connect the “Flat file source” green arrow to the “Sort” transformation.


  • Right click on the “Sort” transformation and select “Edit” option. Then “Sort Transformation Editor” window will open.


  • Select the required column to sort the data based on that column, and then select the Sort type.


  • Click “OK” Button to complete the sort transformation mappings.
  • From data flow items drag and drop the “Flat file destination” into designer surface and connect the “Sort” transformation green arrow to the destination.
  • Edit the “Flat file destination” and configure the target file.


  • Execute the package.


Target file “Sort_Target” data:


Target file data is in descending order.


Thursday 6 September 2012

FUZZY GROUPING TRANSFORMATION


Introduction:
            Using “Fuzzy grouping” transformation we can find the duplicate records.

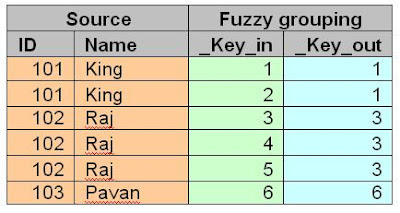
            Fuzzy grouping transformation will add few additional columns to the “transformation” output along with source columns. In those, with the help of “_Key_in and _Key_out” columns we can find the duplicate records.

Example:
  • Find the below table with source data and corresponding “Key_in and Key_out” values.


  • _Key_in returns the unique number for each record.


  • _Key_out returns unique number for each group (duplicate record set), and same number for a group of records.


  • Key_out value for a group of duplicate records is the Minimum “_Key_in” value of the same group.


  • If “_Key_in is equal to _Key_out” then that record is valid record otherwise duplicate record.


Sample package creation:
Requirement:-
            I have a source table that contains duplicate records. I want load the source data into target table, while the time of loading skip the duplicate records.


Package creation:-
  • From control flow items, drag and drop “Data flow task” into designer surface.
  • Right click on “Data Flow Task” and select “Edit” option then it will go to “Data flow”
  • From data flow items, drag and drop “OLEDB source” into designer surface. Create the source table mappings.
  • After source mappings, drag and drop the “Fuzzy Grouping” transformation into designer surface. Connect the source green arrow to the transformation shown below screen shot.


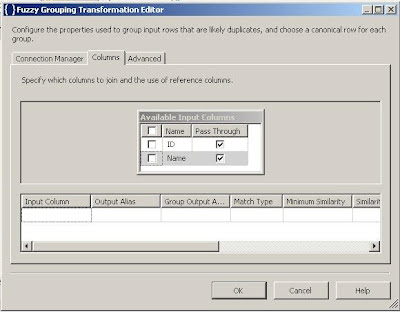
  • Edit the “Fuzzy grouping” transformation, then “Fuzzy grouping transformation editor” window will open.


  • Specify the connection manager. The OLEDB connection is required to create temp table for performing “Fuzzy grouping” operation.
  • Click on “Columns” tab.


  • Select the required columns to find the duplicate records.


Four your information: ID column data type is “INT” so match type is “Exact”. “Name” column data type is “varchar” so matched type is “Fuzzy”.

  • Click on “Advanced” tab.


  • Name column is having string value so we need to find the fuzzy match.
  • If we give “Similarity threshold:” as “0.80” the string column values should match more than 80% then only it will treat as duplicate record other wise it will treat as a valid record.
  • Click “OK” button.
  • Drag and drop the “Conditional split” into designer surface. Connect the “Fuzzy grouping” transformation green arrow to the “Conditional split”. Then write the required condition to filter duplicate records.
    • Condition: [_key_in]== [_key_out]


  • Click “OK”.
  • Drag and drop the “OLEDB destination” into designer surface, then map the target table. After that execute the package.


Target table output:

Tuesday 4 September 2012

FUZZY LOOKUP TRANSFORMATION


Introduction:
            Using Fuzzy lookup we can find the percentage matches between two strings.

Sample package:
Requirement:-

Source table:-
            Source table is having persons information (ID, Name, and Gender) shown below.


Lookup table:-
            Lookup table is having valid person’s names, shown below.


Target table:-
            We need to populate target table with valid records from source, using lookup table.


            Source table is having person’s information (Valid and invalid). Lookup table is having valid person’s names. I want to extract valid person’s information from source with the help of lookup table, and load it into target table.

            Source and lookup table person names (data in the Name column) are similar but not exactly matched, so we need to find percentage matched between the name columns. Based on that percentage we need to take decision weather that particular record is valid or invalid.

            Lookup transformation creates additional columns, in those “_Similarity” column returns the percentage matches between the mapped columns. Using conditional split we can split the data into different sets (valid and invalid records).


Package creation:-
  • From control flow items, drag and drop “Data flow task” into designer surface.
  • Right click on “Data flow task” and select edit option then it will go to “Data flow”
  • From data flow items, drag and drop “OLEDB source” into designer surface. Create the source table mappings.
  • After source mappings, drag and drop the “Fuzzy Lookup” transformation into designer surface. Connect the source green arrow to the transformation shown below screen shot.


  • Edit the “Fuzzy Lookup” transformation. Select the reference table (Lookup table) shown below.


  • Go to “Columns” tab.


  • In the above screen shot, two mappings are available between the ID and Name columns. We need to delete the ID mapping, because we need to find the valid records based on name field only.
  • Click on the ID mapping line and press delete button from the key board then mapping will get delete. Select “Name” column check box, from lookup columns. See the below screen shot for reference.


  • Click “OK” button, then “Fuzzy Lookup Transformation Editor” window will disappear.
  • Drag and drop the “Conditional split” transformation into designer surface.
  • Connect the “Fuzzy lookup” transformation green arrow to the “Conditional split”.
  • Edit the “Conditional split” and expand the columns.


  • Drag and drop the “_Similarity” column into “Condition” box.


  • If the strings are matched more than 60% then I want to consider that particular record as valid other wise we should ignore.

Condition: _Similarity>0.6


  • Click “OK” Button.
  • Drag and drop the “OLEDB destination” into designer surface.
  • Connect the conditional split green arrow to the “OLEDB destination” then “Input and output selection” window will open.


  • In that window “Output:” dropdown list select the case name (Case 1).


  • Click “OK” button.
  • Edit the “OLEDB target” and map the target table. After that execute the package.


Target table output:


Note: R King is not loaded into target table because the record is invalid record (Reference table doesn’t have the “R King” information).