Friday 21 November 2014

Source file existence check


         If the source file is not available then ETL execution will fail. For avoiding this failure, we can implement a task to check the source file existence, based on source file availability we can take further action.

In this post i am going to explain 'Source file existence check' in two ways
  • Using 'Script task'
  • Using 'Foreach Loop container'

Using Script task:
     Step 1:
  • Create the below three variables
    • Name: SourceDirectory     Data type: String     Value: D:\Source\ (Source directory)
    • Name: SourceFileName     Data type: String     Value: Customer.txt (Source file name)
    • Name: FileExistence           Data type: String     Value: False
      Step 2:
  • From Toolbox drag and drop 'Script task'.
  • Edit the script task and select ScriptLanguage as "Microsoft Visual Basic". Select 'SourceDirecotry' and 'SourceFileName' variables in the "ReadOnlyVariable" list. Select 'FileExistence'  variable from the "ReadWriteVariables" list.
  • Click on "Edit Script..." button. Vb script will open, used the below script to check source file availability.


        dim FullPath = Dts.Variables("User::SourceDirectory").Value.ToString() + Dts.Variables("User::SourceFileName").Value.ToString()
        If System.IO.File.Exists(FullPath) Then
            Dts.Variables("User::FileExistence").Value = "True"
        Else
            Dts.Variables("User::FileExistence").Value = "False"
        End If

 
  • Save the script. Close the 'Integration Service Script Task' window.
  • Click on 'Script Task Editor' window 'OK' button.
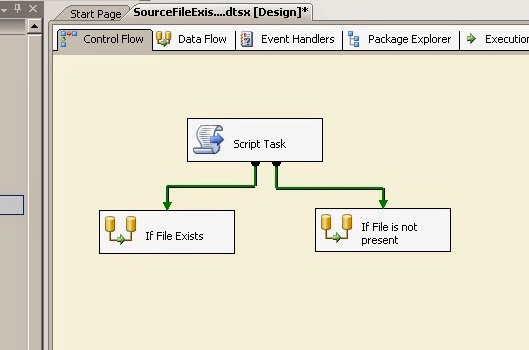
  • From Toolbox drag and drop two 'Data flow tasks'. 1st task will run if source file is present. If source file is not present second task will run. For this process i am going to write expressions.
  • Connect the Script task green arrows (precedence constraint) to the Data flow tasks.
 
      Step 3:
  • Right click on the first 'Precedence Constraint' and select 'Edit' option.
  • 'Precedence constraint Editor' window will open.
  • Select 'Expression and Constraint' from the 'Evaluation operation' drop-down list.
  • Writhe the expression @[User::FileExistence] == "True"  in the 'Expression' text box.
 
  •  Same way write expression (@[User::FileExistence] == "False" ) for second 'Precedence constraint'
 
      Step 4:
  • Now the Package is ready. Source file is present, so if i run the package, first 'Data flow task' should run.
  • In the above screen we can see that the first 'Data flow task' is executed.
  • Now i have removed the source file. If i run the ETL second 'Data flow task' should run.
  • In the above screen we can see that the second Data flow task is executed. So source file is not present.

Using Foreach Loop container:
     Step 1:
  • Create a variable
    • Name: FileExistence           Data type: String     Value: False
      Step 2:
  • Drag and drop "Foreach Loop container" from the Toolbox.
  • Edit the "Foreach Loop container". Go to 'Collection'.
  • Select 'Foreach File Enumerater' from the 'Enumerator' drop-down list.
  • Give the "Folder path" and File name.
 
      Step 3:
  • Go to Variable mapping. Map the 'FileExistance' Variable.
  • Click on 'OK' button.
  • Drag and drop two data flow tasks from the Toolbox.
  • Connect the "Foreach loop container" green arrow to the data flow tasks.
       Step 3:
  • Right click on the first 'Precedence Constraint' and select 'Edit' option.
  • 'Precedence constraint Editor' window will open.
  • Select 'Expression and Constraint' from the 'Evaluation operation' drop-down list.
  • Writhe the expression @[User::FileExistence] != "False"  in the 'Expression' text box.
 
  •  Same way write expression (@[User::FileExistence] == "False" ) for second 'Precedence constraint'
  
      Step 4:
  • Now the Package is ready. Source file is present, so if i run the package, first 'Data flow task' should run.
  • In the above screen we can see that the first 'Data flow task' is executed.
  • Now i have removed the source file. If i run the ETL second 'Data flow task' should run.
  
  • In the above screen we can see that the second Data flow task is executed.

Wednesday 19 November 2014

SSIS Package Scheduling


       In this post i am going to explain how to schedule SSIS package, using SQL Server Agent.
  • Connect to SQL Server.
  • Expand the SQL Server Agent.
  • Right click on 'Jobs' and select 'New Job...'. 
  • New job window will open.
  • In 'General' section give the required name in the "Name" Text box. If required give the description, in the description text box.
 
  •  Go to 'Steps' section and select the "New" button.
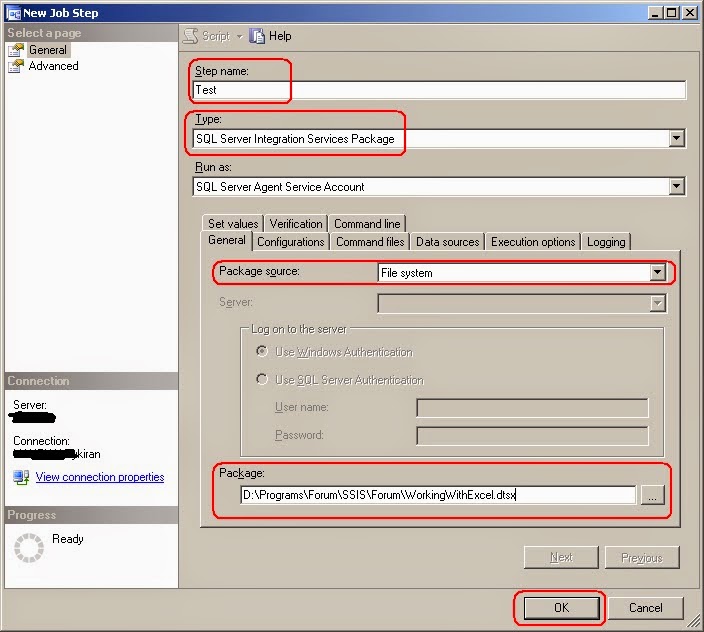
  • 'New Job Step' window will open.
  • Give the name in the 'Step Name' check box.
  • Select 'SQL Server Integration Services Package' from the 'Type' drop-down list .
  • Select 'Package Source'. My package is present in the local drive, so i am select 'File system'.
  • Browse the package package path.
  •  Click on "ok" button.
  • Go to 'Schedules' section.
  • Click on 'New' button. "New Job Schedule" window will open.
  • Give the Schedule name.
  • Select the schedule type. 
  • Select the 'Occurs'. I need to run the ETL on daily basic so i have selected "Daily" from the drop-down list.
  • I need to run the ETL at 1 am, so i have selected 1 am.
  • Click on 'OK' button. New Job Schedule window will disappear.
  • Click on New job window 'OK' button.
  • Job is created. we can find the newly created job in the 'SQL Server Agent' job list.
 

Tuesday 18 November 2014

Checkpoints


      Using checkpoints we can restart the package from the failure point. For creating checkpoints first we need to set three property values. Those are
  • CheckpointFileName
  • CheckpointUsage
    • Never
    • IfExists
    • Always
  • SaveCheckpoints
    • True
    • False
     In 'Control Flow', right click and select properties (don't select any task or container). In properties window you can find the above options.


CheckpointFileName:
We need to specify the path, where we can create checkpoint file (.xml file).

CheckpointUsage:
This is having three options; if we select 'Never' then the checkpoint will never create. If we select 'IfExists' then if the package is failed then only it will create, other wise it won’t create. If we select 'Always', then check point will create always.

SaveCheckpoints:
If we select 'True' then only checkpoint will create.

Note: After setting above properties, select the required task (on which task we need to implement checkpoints) right click and select the properties. set the 'FailePackageOnFailure' option as 'True".

Example:
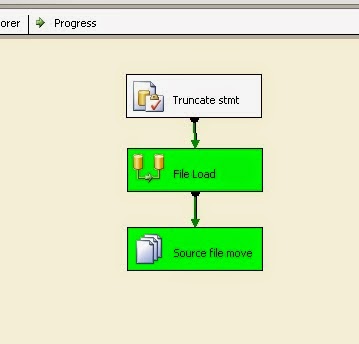
      I am having an SSIS package. That package extracts data from file and loading it into a table. Before loading the data, table will get truncate. After loading the data, moving the source file from source location to archive folder.


     You can see the the ETL package in the above screen. In that package i am going to implement checkpoints.
  • In 'Control Flow' right click and select properties (Don't select any task).
  • Properties window will open, Set the 'CheckpointFileName'
  • Select the IfExists option from the 'CheckpointUsage' drop-down list.
  • Select 'True' option from the SaveCheckpoints drop-down list.
  • Select the 'Data Flow Task', right-click on that and select properties.
  • From the properties set the 'FailPackageOnFailure' as 'True'.

  • I have removed the source file from source location before running the ETL, so ETL will fail during file load.
 
  • We can see in the above screen that the ETL is failed during file load. We can see the check point file in the given path. If we delete the checkpoint, and restart the ETL. Then the ETL will start from the beginning. Don't delete check point if we need to restart the ETL from the failure point.
  • Stop the ETL and place the source file in the source directory and restart the ETL.
  • In the above screenshot we can observe that the ETL is restarted from the failure point.


Tuesday 11 November 2014

Multicast Transformation


        Multicast transformation distributes its input to one or more outputs. This transformation is similar to Conditional Split transformation. The difference between the two is that the Multicast transformation directs every row to every output, and the conditional split directs a row to a single output.

Example:
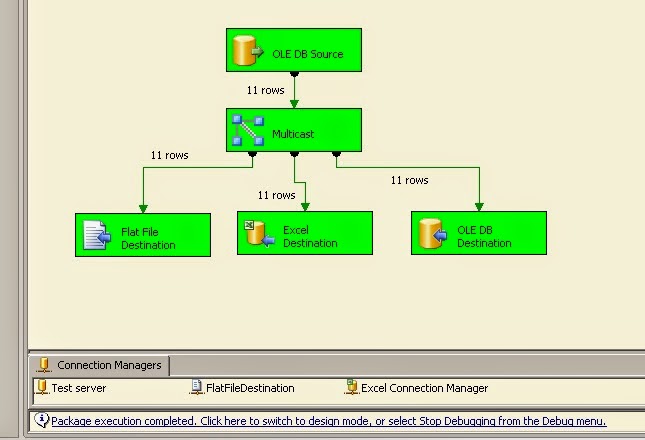
      In this example i have a source table (Employee table), this table data i need to distribute to three different targets (Flat file, Excel file and OLEDB destinations).


  • In control flow drag and drop Data Flow Task
  • Go to Data flow and drag and drop required source (OLEDB Source) and configure.
  • Drag and drop Multicast Transformation and provide connection between source and Multicast transformation.

  • Run the package.