Using lookup transformation we can find the matched and
unmatched records.
Sample package:
Requirement:-
Source:-
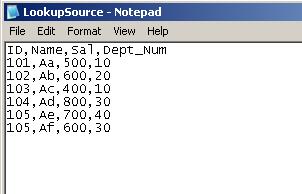
I have a source file that contains employee data (ID,
Name, Sal, and Dept_Num). The source file is having few invalid records with
wrong department.
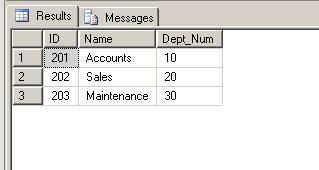
Lookup table:-
Department table is having valid department information.
Target table:-
I need to load the valid data into target table, with the
help of source file and lookup table.

Package creation:
- From control flow items, drag and drop “Data flow task” into designer surface.
- Right click on “Data flow task” and select edit option then it will go to “Data flow”
- From data flow items, drag and drop “Flat file source” into designer surface. Create the source file mappings.
- After source mappings, drag and drop the “Lookup” transformation into designer surface. Connect the source green arrow to the transformation shown below screen shot.
Note: I am
going to find the valid records from source, by checking the department value
in department table because department table is having valid departments
information. So we need to join the two data sets (Source and lookup) based on
Dept_Num column. Make sure while the time of join Dept_num column data type is
same from source and lookup datasets.
- Dept_num data type from source file (varchar(50)) is not matching with lookup table (INT), so we need to do data conversion.
- Instead of “Data conversion” transformation we can use “Advanced editor”. Follow below steps.
1. Right click on “Flat file source” and select “Show
advanced editor” option.

2. “Advanced editor for flat file source“window will
open.

3. Click on “Input and output properties” tab.
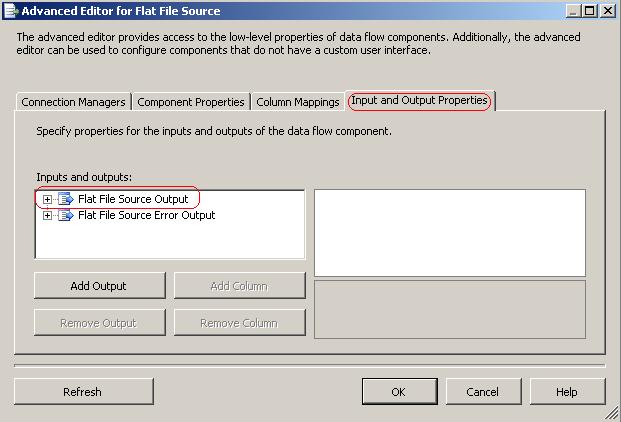
4. Expand the “Flat file source output” highlighted in
the above screen shot. In the “Flat file source output”, expand the “Output
columns”.

5. In the “Output columns” select “Dept_Num” column.
Then right side of the editor window we can find the properties of the column.

6. In the “Data Type Properties”, enable the drop down
list of the “Data type” and select data type “four-byte signed integer [DT_I4]”. Because Dept_Num column data type in the lookup table is "INT".

7. Click “OK” then editor window will close. Data
conversion of the “Dept_Num” column is finished.
- Edit the lookup transformation.
- Set the “Redirect row to no matched output” to handle the rows with no matching entries.

- After that select “Connection” option (highlighted in the above screen shot) and create connection manager and select the lookup table.
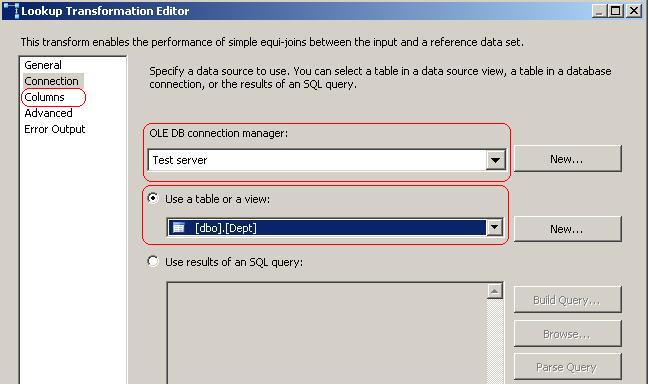
- Click on “Columns” option (highlighted in the above screen shot).
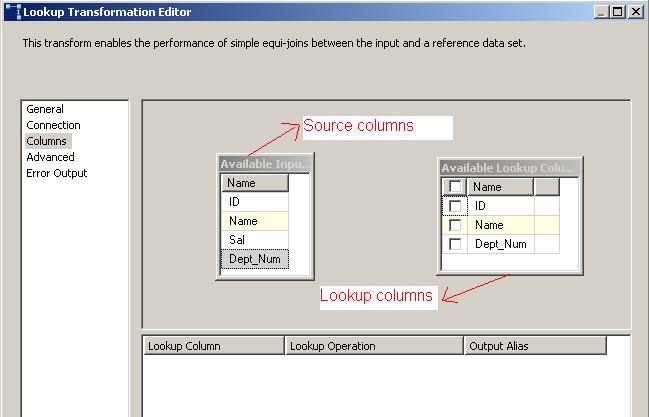
- Right click on source or lookup columns and select “Edit Mappings” option.

- “Create relationships” window will open. Select “Input column” and “Lookup column” as "Dept_Num".

- Click “OK” to finish relationship.

- Click “OK” button in the “Lookup transformation editor” window, then window will disappear.
- Lookup transformation mappings are finished.
- Drag and drop the “OLEDB destination” into designer surface.
- Connect the “Lookup transformation green arrow to the “OLEDB destination”, then “Input output selection” window will open. In that select “Output” as “Lookup Matched Output”.

- Click “OK”
- Edit the “OLEDB destination” and give the target table mappings.
- If unmatched records are required then drag and drop the one more destination from tool box. Connect the "Lookup" transformation green arrow to the new target. Edit the new target and give the mappings.
- After mappings, execute the package.

Target table output:

Department 40 is invalid
department, so the dept 40 related records are not loaded into target table.


